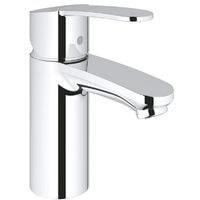
How to take apart a grohe bathroom faucet. Grohe faucets are known for their longevity and their sleek and clean design. They can be the very best choice for your home as they look fine and also they last for about 20 to 30 years straight.
But still, you have to make up your mind to upgrade it, or you have to replace it for any possible reasons. They can get faulty due to any reason or start leaking.
If you are looking to hire a plumber to do the job, then you have to stop right away because Grohe bathroom faucets are very easy to remove. You don’t need to pay a plumber to do the job. You can do it yourself.
But to DIY it, you have to dig into your toolbox to get some supplies that are very basic and can be easily found in your toolbox. And then you need a good amount of instructions.
But before that, you have to identify the type of handles the Grohe faucets have, but that doesn’t matter a lot which type of handles faucets have; the process of taking them off is going to be pretty much the same for both types of handles
How to take apart a grohe bathroom faucet
If you have Grohe faucets installed in your space, then they must be cartridge faucets. To control water supply, whether it is going up or coming down, plastic to metal cartridges are installed and possibly available in 2 types.
Single hand cartridge
If your faucet has a single faucet, then it will control both temperatures, cold and hot, in one faucet using one cartridge.
Double hand cartridge
As it is clear by reading the name, it controls one separate handle and separate cartridge for cold water and another handle and another cartridge for the hot supply of water.in short, they have cartridges to control the hot and cold water supply.
Replacing the Cartridge
After identifying the type of faucet now, you are one step closer to taking apart the Grohe bathroom faucet in an easy way.
As faucets long for about 30 years, but they can still start leaking midway, and in that case, you have to replace them or repair them according to the problem. But you have to identify the problem.
Identifying the Problem
- If your faucet is getting clogged, then it means that something is stuck inside it and water is not finding its way to come out of the faucet. If your faucet is blocked, then you have to repair it or replace it.
- If your faucet is leaking then it means that problem is the seal that is covering the cartridge. Because the seal around the cartridge gets broken, then it will start leaking water. Another reason for water leakage could be an obvious problem in your faucet itself.
Taking apart a Grohe Bathroom faucet
If you are done identifying the problem, then it’s time to take it apart. To take it apart, you have collected some supplies and follow the instructions below.
Supplies You’ll need
To start the process smoothly, you have to dig into your toolbox to get some supplies that will help you to take off your Grohe Bathroom Faucet.
- Allen Wrench
- Flathead screwdriver
- Modifiable wrench
Turning off the water supply
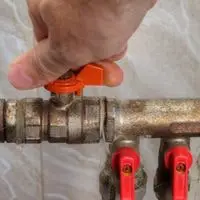
The first step is to turn off the water supply to stop the water from getting drained, and you can easily start the process of taking off the Grohe faucet without any disturbance.
Turn off the water supply by shutting off the hot water and colder water valve handles that you can locate under the sink.
Locate the cartridge
After completely shutting off the water, now make sure to remove the air that could be stored in the faucet handle. To do this, move the faucet’s handle in an up direction to release the excess air or stored water in the faucet handle or pipes.
Locating the latch
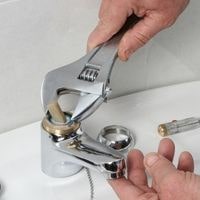
Locate the latch under the handle. The latch is holding the faucet’s handle, checking if the plastic cover is lying around the nut. Then use a screwdriver to remove it. After removing the plastic coating, now remove the latch using an Allen wrench.
Remove the Screws
Remove the Screws with your hands but if the screws are a bit stubborn, then use the wrench to loosen them and then remove them with your hands.
Remove the Cartridge
Remove the cartridge by pulling it up and by making sure that nothing is left behind that can get stuck later and can become a reason for a clogged faucet in the future.
Inserting a New Cartridge
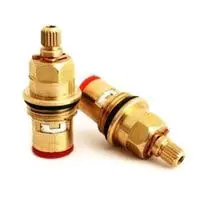
Now insert a new cartridge by reversing the process of removing it.
Turn on the Water Supply
After successfully removing the cartridge now it’s time to check if the Grohe faucets handle is successfully repaired or not. To do this, you have to turn the water back on to check that everything is going smoothly.
The water turning on the valve is under the sink. If your sink is working properly, then Hey, you have done a good job. How to take apart a Grohe bathroom faucet.
Related Guides