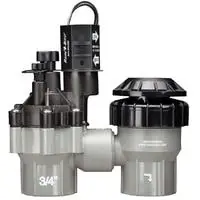
Sprinkler anti siphon valve leaking. Anti-siphon valve is good to have in irrigation and backyard to flow the water in just one direction. It is very useful in fertilization because it stops the water from draining back into the water supply line.
It starts leaking due to the dirt entering the valve. When the water supply is turned on then, this dirt will stop the poppet from seating fully.
This issue also occurs due to the damaged rubber gasket or the faulty poppet. If the rubber components of the valve are exhausted, then the water will starts leaking the water.
Sometimes when the seal of the valve bursts then, the water also starts dripping. If any of these components become damaged, then you will have to replace the valve with a new one.
If you will not fix this issue of a leaking sprinkler valve, then water will continuously waste all the time and can damage the other parts of the property.
Sprinkler anti siphon valve leaking
If the water is not shutting off from the anti-siphon valve, then mostly it is problem in the diaphragm valve due to which water is continuously leaking.
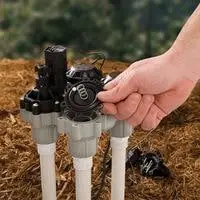
Sometimes you can fix this issue by just tightening up the bolts of the valve with the help of a screwdriver.
If the leaking of water stops due to tightening of the screws, then it is well and good; otherwise, you will have to replace the sprinkler valve, which is not a difficult task to do; you can do this task in a few minutes following these steps.
Turn off the supply of water
The first step to do when you want to inspect and fix the issue of the sprinkler valve is that shut the supply of water from the main pipeline tank in the home.
Due to this, you can easily open the screws of the valve and replace it without disturbing water.
Cut the pipe attached to the valve
Now it’s time to cut the bit of PVC pipe which is running into the anti-siphon valve with the help of a knife.
You know that more than one siphon valve is connected with the first head of your sprinkler structure. That’s why you will have to cut the piece of pipe of the first sprinkler head also.
Buy a new anti-siphon valve
If you have the warranty card, then you can replace the old valve with the new one but try to buy a valve of the same size which can be easily fitted into the PVC pipe.
If, unfortunately, you do not find the same size of the new valve, then you can take the help of the PVC to diminish the coupler to correlate the size of the new sprinkler anti-siphon valve with the size of the PVC pipe.
If you are facing difficulty, then you can also take the help of a plumber to solve your issue in purchasing and matching both items.
Saw off the pipe and connected couplers
After purchasing the new valve, now the first step is to connect a coupler to the head of the PVC pipe at the place where you cut it before when you detached the previous valve.
Now put glue on the corners of the coupler and PVC pipe. After that, cut a small 3-inch part of the pipe and put it into the coupler.
Installation of new valve
Now, this is the last step of the installation of the new valve as you fixed the new PVC pipe pieces and couplers.
Take a primer and glue it, and put it on the pieces of pipe inner fittings of the valve. Now force the fixture of the valve into the pipe which you already cut.
While pressing, ensure that the first pipe is attached to the anti-siphon edge of the fixture while the second pipe is attached to the head of the first sprinkler that is connected to the valve.
Switch on the water supply
After the complete installation, switch on the supply of water and inspects your new valve.
If you have properly fitted the installation, then the main problem of leaking water is solved.
Conclusion
Sprinkler anti-siphon valve is very useful for fertilization purposes, but if it starts leaking, then immediately replace it with the new one and install it properly through the above steps to save the property and waste water.
Related Guides