
How to replace a bathroom exhaust fan without attic access. Sometimes you are in a hurry, and you at that time do not have access to the attic. It can be some other reason, but your bathroom exhaust fan isn’t working. So you need to replace it without any access.
I have had a similar experience since. My fan’s motor got out of order, and so I had to replace it. But because I didn’t have access, I thought I wouldn’t be able.
Still, I reached and asked a professional friend of mine. The way he told me was the best. I was able to do it so easily.
What he told me is present in this article.
How to replace a bathroom exhaust fan without attic access
Outside ventilation is a must requirement. Suppose you cannot get to your attic. Then it doesn’t mean you won’t have outside ventilation. But you will need some other way to replace it.
You will need to do this through the sidewall. Yes, ventilation with the sidewall is a choice.
Usually, these ducts are built when the house is under construction. But let’s not go there, the steps are hard, and the work is risky. But the results are going to be worth the effort.
Requirements
- Replacement fan
- Screwdrivers
- Saw
- Paint scraper
- Pry bar
- Screws
- Tape
- ladder
Steps
After completing the requirements, follow these steps.
Measurements
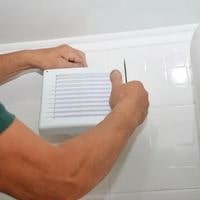
The first step is cutting power. Turing of the mainboard is the better choice. Take the screwdriver set and a pen, and then put a ladder beneath the place you had the old fan. Climb up. Check the grill screws and unscrew them. Then pull it.
Now check the size of the fan. If you bought the same sized fan, then you won’t have any problem. But if you bought a different sized one.
You need to put and then mark with the pencil you have. Check the template and if you do not see one, check the guide for measurements.
Sizing
After the measurements are over and you now know the length at which you want to cut the wall. You will need the drywall saw for this.
Do this process carefully. Do not let pipes and wiring get cut.
If the length is too much, you can close it with the help of extra drywall. After that, with the help of the edge of the scraper, remove the insert by popping it up from the center of the old fan.
Removing wires
As you have made the curs. The wires will be seen. Grab the wires or with some other way and pull them now, as they are close.
Remove the nuts and the wires. If there is a grommet or bolt, remove them too. Make sure you have removed all the wires.
Removing old fan
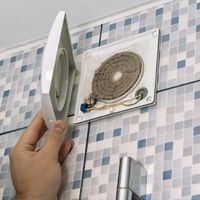
Remove the tape that you see around the housing and the fan. The exhaust pipe will be connected to them. Slice through it if peeling doesn’t work.
Unscrew the screws connecting the ceiling joist and the housing.
Now you need to lift it. You can use a pry bar. Try slipping it. Make sure it goes under the ceiling and at the side of the fan. Now by prying, remove it.
Installing outlet and housing
Now installing an exhaust outlet is the main point. Check the arrows. They will help you to get the installation done in the right way. Now you need to set it towards the duct.
It will be easier if someone holds it for you after you have set the duct. You should use tape to cover them and make the connection stronger.
After connecting the housing with the duct, you need to connect it to the ceiling. Rush through a hole in the ceiling. Holding it with one hand, pull the wires to the housing.
Now by looking at the dimples, drill the holes. Flushing the housing with drywall and screwing it
Connecting wires
Now connect the wires with their respective colors. Make sure they do not touch each other. Use wire nuts for safety. Now place them in a safe spot. Put the cover back and screw it, so it doesn’t move.
Completing and testing
Now you need to put the fan assembly. Slide it to the housing. If you see screws, then tighten them. Now, if all parts are in their place, test it.
Conclusion
You do not need to worry about installation after you have read this article. This is a completely paved path. If still not satisfied. You can get a professional.
Related Guides