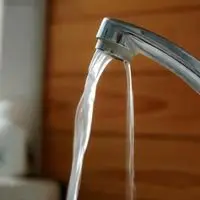
Faucet turned off but water still running. Faucets are very useful and play a significant role in especially our households .faucets make life easier, and if you are good at choosing the best designs of faucets, then it will give you a good sleek look to your house as well.
But if you fail at choosing quality over design, or your faucets start leaking even if it’s turned off, then you have to fix this issue immediately because it will lead you to the leakage of water, which means you have to pay higher water bills this time.
To start fixing the leaking faucet that is still releasing water even if it’s fully turned off, the first step that you need to take is to check whether the faucet handle is fully closed or not because some homeowners forget to fully close both faucet handles.
If both faucet handles are fully closed and water is still flowing, then this means that something is troubling the system. Before starting the fixture process, firstly, you have to check which type of faucet you are using.
Faucet turned off but water still running
Recognize the Faucet
To start the fixing process, the first step that you have to take is to identify which type of faucet you are using so that you can buy the best replacement part. So there are four common types of Faucets.
- Ball faucets
- Compression Faucets
- Disk Faucet
- Cartridge Faucet
Compression faucets are the only ones that use rubber washers in the valve seat, while other sorts of faucets operate using O-rings.
The valves that you need to especially look up to them are
- Valve Seats
- Cartridges
- Gaskets
- Washers
after checking up on the types of your faucets, you now have to identify the causes.
Causes of faucets that won’t turn off
If your faucet keeps on leaking water, then there is an issue with the faucet’s hardware. So there could be these most common reasons that are causing the running water of faucets.
- Cracked or Damaged Cartridges
- Dirty Seat
- Stripped Seat
- A gasket requires replacement
- A washer requires replacement
Its time to start the fixing process
Tools You Need
To start the fixing process, you need to collect some tools.
- Replacement kit
- Flathead screwdrivers
- Adjustable wrench
- Alen number, and if you don’t know the model numbers, then you can look for replacement parts after detaching your faucet. Things you need to gather are listed below Wrench
- Pair of Pliers
- Rags
- Bottle of vinegar
- Plumber’s grease
- Sharp cutter or knife
- Cleaning Cloth
Fixing Process
After gathering all tools now, it’s time to start the fixing process for the running water after shutting the faucet completely off by going through these steps.
Step 1: Blocking the Water Supply
Before doing anything, block the water supply first because if you do not do so, it will create a huge mess by loading your place. To locate the main water supply switch and turn it off.
Some faucets have their valves beside or under them. Simply rotate them in a clockwise direction until they tighten completely, and then turn on the faucet to check if the water is still dropping or not.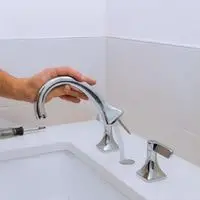
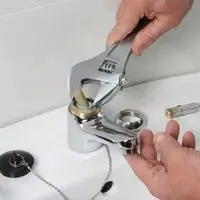
Step 2: Removing the Faucets handle
Right after blocking the water supply, you can now remove the faucet with the help of pliers and a screwdriver. Remove the faucet handle using a flathead screwdriver.
Now when the faucet hand is removed, it will show off the screws hidden behind them. Now remove the faucet screws by pulling the handles up.
Step 3: Replacing Faucets Stem
You need an adjustable wrench to remove the faucet stem. Loosen the screws with the help of a wrench to reveal the faucet stem.
Tip: if screws are rusted or stubborn enough to open them, then use Plumbers Greece or oil and wait for a few minutes until grease shows its magic, and then, with the help of an adjustable wrench, loosen them
After removing the screws, the stem will pop up, or you simply have to put it up.
Step 4: Replacing O-Rings
O-Ring is made up of Rubber which is located at the midpoint of the faucet’s stem. Check if something is wrong with the O-ring and then replace it with the new one.
Step 5: Replacing Washer
Water sits at the bottom of the faucet stem inside it. Analyze the washer if it is worn out or damaged, then replace it with the new one if found damaged.
Step 6: Rejoin the faucet
After you are done placing new O-rings and washers then, it’s time to reverse the process by reassembling all the parts of the faucets.
Make sure you don’t over-tighten any screws or any fixing thing. Over-tightening can break the parts, and you will drop yourself in big trouble.
Final Instructions
Make Sure that you reversed the above process properly, and now everything is in its place, and Faucet is rejoined perfectly. Now turn back the water supply valve on and then check water is running or not.
If water is running smoothly out of the faucet, then turn the faucet off to check that water has stopped leaking.
If water is still running after turning the faucets off, then it is advised to call a professional plumber.
Related Guides