Underlayment for tile on concrete slab. Tiles, we have all seen them in our daily lives. Tiles are in both square and rectangular shapes. They are supposedly thin.
The building material from which they are made up can be metal, ceramic, or clay. Stone, and maybe even glass. They are used in places such as floors and roofs.
They can also be placed on walls. There are different uses for the different designs. The place looks better because they are strong.
They have different prices depending on the material that they are made of. Some prices of tiles are really high and not easily affordable, others are that many people can buy cheap.
Underlayment for tile on concrete slab
You do not need to use any kind of underlayment on the concrete and below the tiles, meaning in between them. Some surfaces should be prepared before you install the tiles. The presence of cracks and unleveled areas can inflict damage on the tiles that you are going to use above. The presence of moisture can also be harmful to the concrete.
How to do underlayment of tiles on a concrete slab
There are fixed rules to be followed precisely for the correct installation of tiles on a concrete slab. The steps are listed as follows:
Cleaning the area
Before starting the installation of tiles in any area. You need to clean the area. There should be no dirt or anything there that could not allow the concrete to settle properly.
Preparation of concrete and leveling
As we want to install the tiles on the concrete slab, we actually need the concrete. So, preparing the concrete is a basic step.
You need to mix the concrete well and then lay it on the floor or the place you want. Make sure the area on which you put concrete is leveled with the help of concrete.
Check the level, again and again, to make sure there is no uneven distribution of concrete anywhere. You need to level the surface so you will need underlayment.
Using underlayment
Go to a store and from there you need to purchase self-leveling underlayment. The self-leveling underlayment will help you level the concrete.
Use leveling compounds and close the cracks if you see any.
Rolling and brushing latex
Compounds like LevelQuik are quite useful in leveling the surface. They are suitable and strong.
Their chemical formula allows for better results.
Smoothing the edges
After you have poured the underlayment use some tools to smoothen the edges of the concrete for safety and the long life of the concrete.
Preparation of the layout
Use chalk to mark the area, length, and width. This will help you in placing the tiles in the correct area and you will also know how many tiles you are to use in that area.
Unpacking the tiles
You must have bought the tiles already if you were going to start the installation.
Still, check the tile to see if they are damaged or their design is wrong. You can do this by unpacking them.
Placing the tiles thoroughly
Place the tiles thoroughly and check if they are in the correct place so you will know if the tiles fit or not.
You can also the tiles in the length they are needed as there can be different sizes of places you want to set them in.
Preparing the edges

The edges also need to be cut for our own safety and the safety of the tiles as well. The places with edges are easy and first to break.
Installing the tiles
Remove all the tiles from the floor and put them aside. Select the area where you want to start the installation.
The best place to start is the farthest area from the door.
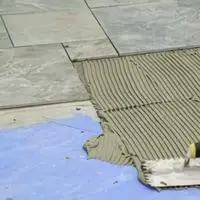
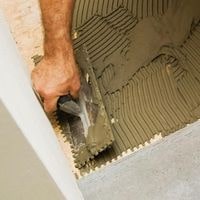
Spilling the thin-set mortar
You need it to fix the tiles so that they are not moved. Spread and smoothen it around the whole area. Make sure not to let any uneven distribution occur.
Use a comb to make the area a bit horizontal. This is to fix the tiles properly.
Placing the tiles
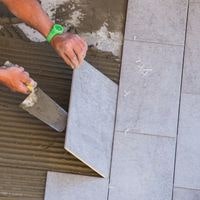
You can now install the plates in the specific order you want and tested before. Just place the tiles properly and use a bit forced to make them join together.
After installing all the tiles wait for 24 hours for them to dry.
Grouting
Put the grout in between the spaces of the tile and wait for it to dry. It will take about 2o min.
Cleaning and scrubbing
Clean and scrub the tiles to bring their shine and smoothness back.
Conclusion
Always take safety precautions and do your work thoroughly for better results. This will make sure the work you have done will last longer.
Related Guides