
How to wire a lamp with multiple bulbs. It is said that problems force us to think more clearly. But how long would you be polite if they ask you to connect a light with two or more bulbs?
This isn’t a test; it’s a possibility that you’ll be confronted with shortly. So, until that occurs, you’ll discover how to connect a lamp with several bulbs in this post.
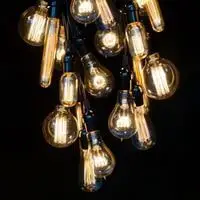
Reconfiguring a lamp or a table lamp with 2 or maybe more bulb connections presents a different set of problems than wiring a single-bulb lamp.
Not only does the original connector light wire go up thru the bottom of the lamp, but it is also attached to auxiliary cords that run to each of the outlets inside the lamp’s structure.
Such attachments are often made within a wire connector housing at the head of the lamp bases, covered by a detachable cover. So, how do you connect several lights to a lamp?
To achieve this, you’ll need a lot of patience. Don’t save time by skipping steps since you could wind up inflicting additional harm to your light.
A couple of your lamp’s pieces must be removed and unscrewed before you can change the wiring. Here are the instructions for wiring a light with two lights without any further addition.
How to wire a lamp with multiple bulbs
Try uninstalling wiring and detach the lamp:
Lift the cover and disconnect the lamp. Disconnect the wire connecting the chamber cover, which is generally a basic flip cover.
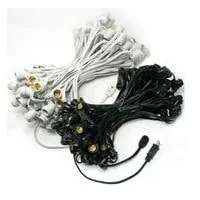
After that, snap the outermost layers of the bulb plugs to reveal the interior metal socket and wiring connectors.
Unplug all cables’ main light cable flowing down thru the bottom of the lamp, as well as the 2 short cables heading to the sockets—by disconnecting all screws and cable nuts attachments.
Install the replacement light cord
The lamp wire is cut into three sections. To go downwards thru the bottom of the lamp and to the outlet, the main chord would be several feet in length.
Both other cables will be shorter, just able to reach the lamp base’s central wire shielding from the board connections.
Divide the wire tips along the cord’s middle seam to create two distinct pieces, each about 2 inches in length.
Sometimes, just drawing the rope apart with your fingers will be enough. You may also use a pocket knife to cut the cord along the middle gently.
Connect the cables
Run the cables through the lamps, with the big ones going up through the bottom and the short ones going through the outlet holes.
Because this is a complex procedure, take your time and work gently to prevent kinking and restricting the cables as you run them.
A set of syringes or tweezers might be useful for grabbing the wires’ ends when they become apparent.
Wiring the ports consist of the following steps
Attach the light cables to the outlets using the shorter lamp cables. Small bumps on the plastic coat identify the neutral side of the split cable, which you can feel with your fingertips.
- Connect this portion to the metal socket’s silver-colored necessary screws connector. The twisted wire should be a looped circular all-around screw, then tightened around the cable.
- Join the smoother side of the lamp wiring (the hot wire) to the copper-colored screw connector on the outlet in the same way.
- Replace each other lamp plugs and continue the cycle.
Connect the socket cables to the light cord as follows
Coil the exposed tips of those neutral cables together and tighten a wiring screw over the exposed tips at the center wire connecting box.
Carry out the same procedure with the charged wires.
The primary lamp cord’s hot & neutral lines are now connected to the hot and neutral cables that travel to each outlet.
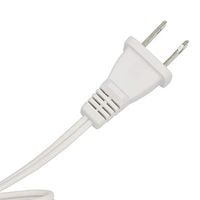
Start installing the plug as follows
To connect a new cable plug, begin by removing the plug’s center. Insert the lamp cord’s tip through the exterior plug cover, then connect the wires to the plug system’s screw terminals.
If the center is polarised, one of the edges will be larger to differentiate the normal blade from the charged blade, narrower. Link the screw connector attached to this larger blade to the stable half of the light cable.
Connect the smoother part of the light cable to the shorter blade of the hot screw connector.
After testing, connect the light as follows
Put the outermost layers securely into the lamp after reassembling the light bulb connections within their outer shells. When you finish assembling the lamp, ensure the bulbs are working correctly by plugging them in.
Conclusion
This is the end of this article. We hope that we have discussed all the procedures and have cleared all your confusion.
Related Guide