How to waterproof wood for bathroom. Bathrooms are part of a house with the highest moisture and humidity level. This humidity and moisture cause the rotting of wooden items in your house, especially the bathroom.
Some of the damages resulting from this are costly to fix, so it is always better to take precautionary measures beforehand.
This article will explore different methods to waterproof wooden bathroom fixtures.
Essential Tools
To water-proof your bathroom’s wooden fixtures, you will need these essential tools:
- Sandpaper
- Brush
- Paintbrushes
- Safety gloves
- Waterproofing agents
How to waterproof wood for bathroom

There is more than one way to waterproof your bathroom wood. Some of these options are:
- Using Wood sealers
- Using Acetone and Resin
- Using Oil
- Using Varnish
Depending on your requirements, you can use any of the methods mentioned above to waterproof your bathroom wood.
Preparing the Wood Surface
You will start the water-proofing procedure by first preparing the wooden surface.
- Use sandpaper to sand the whole surface until it is smooth and ready for the procedure.
- Use a brush to clean the surface; you can use a vacuum cleaner too.
- Use the lint-free cloth to wipe all the dust and debris off the wooden surface.
- Now, the wooden surface is smooth, clean and ready for waterproofing.
Now we will discuss each of the four methods in detail.
Method 1: Using a Wood Sealer
This is the most commonly used method to water-proof wooden surfaces. It is a very reliable and long-lasting solution. Some of the wood sealers readily available at hardware stores are:
- Marine Varnish– It is preferred in the cases where you want the wood to withstand constant moisture with smooth finishing.
- Polyurethane– with this type of sealer, you will get a neat and smooth finishing of the wooden surface. It adds gloss to the surface while giving you the assurance of a water-proof surface that will last for years.
- Lacquer- With this type of wood sealer, you can water-proof the frequently moved furniture. It is not suited for a light-colored wood surface but only for dark-colored wood.
The procedure
After you have chosen the sealer for your bathroom wood, next comes the actual application of that sealer. Follow these guidelines for effective waterproofing:
- Prepare the water sealer.
- Start applying the coats on the wooden surface prepared for the procedure.
- Give the sealant 24hrs times to dry.
- Do not touch the surface meanwhile
- Once the first coat of sealant is completely dried, the surface is ready for the second coat.
- Let the second coat dry.
Method 2: Using Acetone and Resin
Using acetone and resin, you can get the best and most long-lasting result of waterproofing your bathroom wood. Here is how you can use this method:
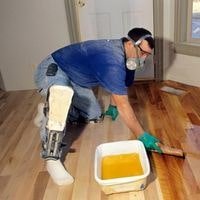
- Mix the resin with acetone in a bucket.
- Apply the mixture to the wooden surface with a paintbrush.
- Let it dry for 10-12 hours. • Apply a few more coats after the first coat has completely dried.
Method 3: Using Oils
Numerous oils are available in the market that can be used for water-proofing bathroom wood. Some of the most common oils are:
- Tung oil
- Linseed oil
- Walnut oil
- Hard wax oil
After selecting the most appropriate oil for the waterproofing procedure, you will start the procedure.
The Procedure
- Make a mixture of the oil and apple cider vinegar.
- Apply the first coat to the surface.
- Let it dry for almost 20-24 hours.
- Apply the next coat and let it dry.
Conclusion
Waterproofing is very important for the wooden fixtures in the bathroom, as it is the part of the house with the most moisture and humidity.
There are several ways to waterproof the wooden surface. You will have to choose the one that suits you most and lasts the longest.
Related Guides


