How to use a multimeter to test voltage of live wires. Dealing with live wires can be fatal as they contain high voltage current flowing.
Most of us will think using this device can be a dangerous task. But wait, here are some easy tips that will help you test live wires.
How to use a multimeter to test voltage of live wires

The device makes the process safe, easy, and quick by measuring the potential difference between live and neutral wires or earth wires.
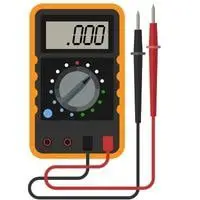
Some parts of a standard device must be in mind before use.
- 4-digit panel screen,
- Selection knob
- 2-3 Ports
Prerequisite
- Take all the necessary safety steps before using the device.
- It is good to switch off the power until you are ready for the test.
Setting the voltage
- Turn on the device. A typical meter device measures voltage within the range of 200 mV to 600 V AC or DC
- Set the voltage V with current settings (AC)
Testing with a working fixture
- Before testing the live wires, try it on a fixture.
- The fixture must be known to be in working condition.
Identifying the probes
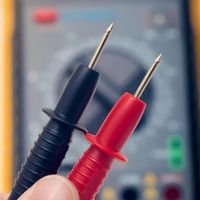
The device contains a positive and negative probe. Identify the red for positive while black for negative.
These probes are attached to the meter.
Testing with a three-port device contains
- COM is used to measure the negative or ground of the circuit.
- mAVΩ measures voltage, resistance, and current up to 200 mA
- 10A measures a very high current.
All it costs is to plug the probes into the correct ports.
It must be according to the parameter that is needed to be measured.
Measure AC
- Measure AC voltage by setting the dial of the device.
- Insert both probes into the vertical slots.
- It’s of no concern both the probes can be in any slot for measuring AC because, in Alternating current, the current is constantly alternating between positive and negative.
- Check the display screen.
- If it shows a voltage between 110-120 volts, the gadget is working accurately.
- Check the meter with an unknown fixture.
- Now, as the meter is working, repeat the procedure for the unknown fixture.
- If the display screen shows a voltage difference between 110-120 volts, this is terms as a live fixture.
- If it displays a 0 zero reading, there might be some problem with the connection.
- Immediately call the electrician for further investigation.
Some cater to three different parameters to measure voltage sets of selection knob to Voltage mode.
- Use the part labeled as V with a wavy line for measuring AC.
- Use the part labeled as V and a straight line for measuring Direct Current.
Tip
- Direct current (DC) is applicable only to automobiles and appliances.
- If you need to measure the Current, Connect the device in series
- Or To measure the Voltage, Connect the device in parallel.
Warning
- If you have doubts about your ability or in case you don’t follow the procedure, a series of damage may occur.
- In such conditions, do consult a qualified electrician.
Safety
- Never deal with a live wire bare-handed. Wear gloves for insulation.
- Take proper steps before checking live wires.
- Always switch from Direct current mode to Alternating current mode.
- The electrical value in the AC circuit should be measured by moving from DC to AC.
- Avoid applying power to the circuit in case of resistance is to be measured.
Conclusion
To ensure the power supply works accurately use of a multimeter is favored. Take serious safety steps while operating a multimeter.
Related Guides