How to sync ceiling fan remote. As technology is advancing with each passing day, people are thrilled with the new inventions and adopting them.
A remote-controlled ceiling fan is one of those newly launched inventions and getting really popular around the globe.
Inventions like these make the life of people but adopting them at first chance can be a little difficult for people.
If you have newly bought and installed the ceiling fans then we can say that you might be having trouble syncing them.
Leave all your concerns and worries to us as we are here to help you save the day with our detailed guide.
How to sync ceiling fan remote

The guide includes all the information you need to know about these remote-controlled fans and a step-by-step guide, so you can relax fully after having a tiring day at work that does not let you move a single step after you have fallen on your bed for rest.
Remote-controlled ceiling fan
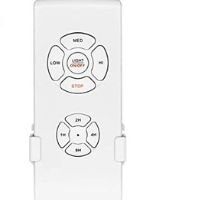
If you are wondering about the remote-controlled fan, these fans are installed just like the regular ones and can be controlled with a remote to turn it on or off.
You can also adjust the speed of the fan from the remote just like an air-conditioner by choosing from different speeds.
Imagine, falling on your bed after a long and busy day at work and needing to adjust the settings of a fan, you do not have to get up anymore to go to the switch because this remote will do everything for you.
Procedure Sync ceiling fan remote
The procedure you have been looking for all over the internet is here.
If you are unable to sync or connect your advanced fans with their remotes, then this procedure will help you do the connection.
The connecting procedure can be different but here is a general one for your understanding.
They are given below as follows:
- The first step of the procedure is to turn your fan off from the remote controller for about 5 seconds to 10 seconds.
- Next, you have to turn the fan on from the switch or socket available on the wall.
- Now, press the power button and speed number 3 button on the remote control at the same time for about 4 seconds.
- You have to make sure that you press the two buttons within three minutes of interval after turning on the fan from the wall socket.
- Your fan is synced to your remote and will indicate you by lowering the speed of the fan. You can adjust the speed of the fan according to your choice.
- It can also indicate the syncing by blinking lights if you installed lights with your remote-controlled ceiling fans.
- If the fan is not synced with the remote, the fan will not lower its speeds nor it will blink lights.
- You will have to repeat the procedure if the remote is not synced from step number 1 but make sure you wait for about 1 minute to 2 minutes before repeating the procedure.
Conclusion
Since you have learned how to connect the ceiling fan remote control, now you can fully relax in your bed, not needing to get up just to turn the fan on/off or adjust the settings.
You might face some issues while syncing the fan with a remote but there is no need to get anxious or worried.
If you follow every step of the procedure we listed above then we assure you there will not be a single problem, issue, trouble, or complexity.
How to sync ceiling fan remote
Related Guides