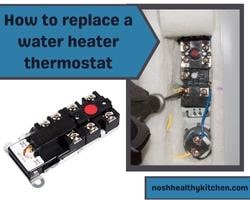
How to replace a water heater thermostat. Draining the power heater after the power to the heater has been shut. Remove the access panel by using a screwdriver.
Peel the insulation back. Adjust the thermostat up or down, and adjust the thermostat to work with a screwdriver.
I wanted to replace my water heater thermostat and get the thermostat heater back on the roll. My thermostat water heater was somewhat disturbing and looked difficult to replace.
I thought I’d need a professional to replace my thermostat, but my friend said the thermostat is easy to replace in the water heater. He told me about the thermostat changing techniques and steps.
The way the thermostat replacement was defined by him made it easy to replace the water heater thermostat. The adjustment of the water heater was easy, and I replaced the thermostat very fast.
How to replace a water heater thermostat
Having a water heater is great as the warmth from the water heater makes the winter disappear in the house.
But sometimes, the water heater thermostat gets broken, and the heat problems begin. No hot water comes from the heater when the thermostat isn’t working. Sometimes the water is hot but not enough.
Sometimes the hot water recovery becomes slow. If the water heater has problems like these, then different thermostats have caused them.
If the issues like low and no hot water appear in the water heater, the water heater is broken. A broken thermostat requires replacement.
Determining thermostat replacement
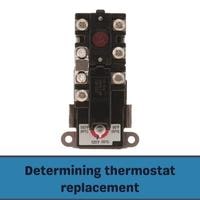
The first step is to determine which thermostats of the water heater are to be replaced. Two heating elements and two thermostats are present in a water heater.
Determining the faulty thermostat is easy. Water is a major factor in determining the faulty thermostat.
If the water doesn’t remain after a while, the lower thermostat has a fault, and the lower thermostat needs replacement. Sometimes the water gets warm, but the water only remains warm and does not get hot.
If the water only remains warm, then the thermostat on the upper side with its head element needs replacement.
The replacement of the upper and the lower thermostat can take about 3 hours to complete. Simple electrical handling should be known if the thermostat replacement is being done by a non-professional.
The replacement of the thermostat doesn’t require a lot of tools. Just a multimeter and a screwdriver are enough.
Cutting power

Safety first, cutting the power of the water heater is crucial.
The power to the thermostat heater is too much; you don’t want to touch the thermostat of the water heater when the power to the water heater is smooth.
Not only the thermostat of the water heater will be hot, but by touching the thermostat, you will get an electrical shock and may even die when excessive current passes through you.
So, to not die through electrical shock from the water, turn the power to the electrical heater from the main board off.
You can turn the whole board off by turning all the breakers off, but you may need light to fix the thermostat off the heater, so turn the circuit breaker connecting to the water heater off.
The 30-ampere breaker will be one connecting to the water heater, and you may have already labeled the thermostat.
Testing power
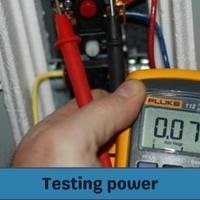
After the power has been cut, it’s better to test if you have switched the right breaker off.
If you turn all the breakers off, you can move on, but if the breaker only to the water heater is turned off, you should follow this.
There are screws on the water heater panel. Remove the screws on the heater’s access panel. Lift the panel off from the water heater.
The insulation on the panel may get in your way. Remove it. Use the multimeter or a volt tester to confirm that the water heater doesn’t have any power. If it has, turns it off.
Disconnecting the thermostat
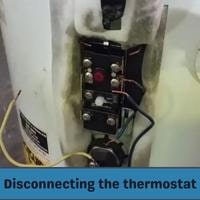
After the power to the water heater is confined to be cut by testing through the meter, the process of disconnecting the thermostat begins.
Start by labeling the wires of the thermostat not to mess up and mix the wires when rejoining them. The labeling of worse will help reconnect after the new thermostat has been installed.
Use tape or something like a marker to point or label them. After labeling, disconnect the wires from the upper or lower thermostat you want to change.
The connection between the upper and lower thermostat is the same. Just the angle is different.
After removing the old thermostat’s wires, remove the mounting clip present on the thermostat. The mounting clip will hold the thermostat.
After removing the clip, take the old thermostat out by lifting it. Check the model name and take the thermostat to an electronics store. Give the thermostat to the electronic store and ask them for a matching one.
Compare the thermostats after you have received the new one and take it back. Replacing the thermostat is the next step. Always get a matching model thermostat for safety.
New thermostat installation
YOu have already bought the new thermostat, and the thermostat matches the model too. Now just installation of the new thermostat is in order.
Put the new thermostat in the panel and mount it with the clip. The mounting clip should be used opposite to as before.
The mounting clip can hold the new thermostat like the old one. Make sure the thermostat you are installing is correctly mounted in the mounting clip.
Reconnect the wires to the terminals like the one connecting the old thermostat. The labeling you did while removing the thermostat will be handy.
Just connect the labeled wires with their terminals and put the lid of the access panel back on the heater.
Use the screws that were placed on the access panel before fixing the panel on it. Tighten the access panel and move to the next thermostat step.
Setting the thermostat
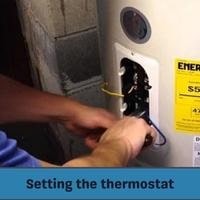
Setting the thermostat is by powering the thermostat from behind. You can now turn the water heater thermostat on and enjoy it. But after powering on, you need to set the water heater with the new thermostat.
Having the instruction from the brand is better because you can set the heat to maximum safety.
The limit is usually 120 degrees, but the limit can vary. Though the limit of all the water heaters won’t actually exceed 140 degrees.
Fill the tank of the water heater as you had drained the tank before working on the thermostat. YOu should fill the water heater tank before powering the water heater.
There is a red button present on the thermostat. You need to press the button for powering too. Now you can add the insulation you removed from the access panel and make it work.
Conclusion
Water heaters are pretty common due to their usefulness. The problem with thermostats is that they aren’t eternal. The problems in the thermostat can delay their heating or not let the water heater heat the water.
Replacing the thermostat in such a case is a neat idea. Replacing the thermostat in a water heater has the steps above. Follow the steps to succeed. Thanks for reading!
Related Guides