How to replace a two handle bathtub faucet. Steps for replacing the bathtub faucets are presented in the article. I replaced mine by following them. You are also welcome to try them.
To be clear, I’m a professional plumber. But these steps were done by my professional friend, and he is the one who recommended them to me as well.
My faucet was broken and didn’t work properly, so I replaced it with a new one using these steps.
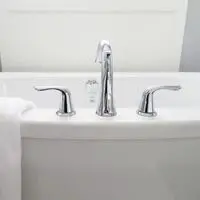
How to replace a two handle bathtub faucet

The first in this is to remove the cap or the cover that is present on top of it. It is usually for decoration and protection.
You need to remove the screws present beneath it. Now, after you have removed the screws, you need to pull them from above. Wiggle a bit and the handle will come off.
You will see the other parts present inside. In order or proper manner, change them. The techniques can be a bit different depending on the brand.
Now let’s see these steps in a bit more detail to perform them. But before that, let’s see the things we will need to perform this task.
Required tools
- Different screwdrivers
- Fittings
- Jigsaw
- Soldering torch
- Slip-joint pliers
- Conversion Plate
Now let us get to the steps that are to be performed for disassembling and then reassembling them.
Water supply closure
Prior to anything else. The basic step to perform is stopping the water supply. This is done so that you don’t have any problems while working.
Water can be a hurdle to your work. You might get drenched because you didn’t stop the water supply. So we perform this task before any plumbing business.
You can close it through the valves that are present near the tub or beneath it. You can also turn the main water supply off if you want.
Removing handles
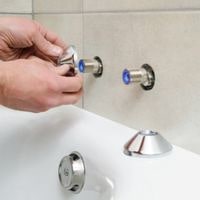
In this step, you perform multiple tasks. First, you need to remove the cover that is present on the handle. It can be in the form of a cap or whatsoever shape, depending on the company that manufactured it.
Check for screws. If there are none, then just use a minor force to lift it up. And if there are screws, you need to unscrew them and then remove the cap.
You will see that there are screws present under the cover you removed. Now you need to remove these screws as well.
Using the suitable screwdriver, remove these screws. Now the handle is free. You need to push it while wiggling upwards. As you lift it up, it will come off.
Store parts in a small box or a bag. This is because misplacing or losing any part will cause a problem while we are installing the new faucet.
Removing stems
Now carefully take everything out of the valve. I mean the things that are connected or linked in any way. Now remove all the stems that surround it.
You can use a wrench and a screwdriver to perform this task. Usually, stems are in a screw shape. You can easily unscrew them.
If they are in sleeve handles, you need to remove the sleeves in order to reach them. Take the screws out if the stems are made of plastic. Keep them in a proper place for safety.
Valve removal
This actually depends upon the structure and how the lines are installed. You might even have to create a hole to perform further tasks.
You first need to teach the hot and cold water lines from it. Perform carefully to avoid problems.
Using a wrench, unscrew the pipes and the lines that might be connecting to the valve. Now slowly take it off. Do it carefully, as you might need it later.
Installation/Replacement
Get a new valve and place it in the location of the old one. Use a wrench and screwdriver to fix it there and attach the hot and cold lines to it.
Check if they are connected correctly because you do not want another problem at your hand.
Wrap couplings and other connectors with Teflon tape. This is to prevent leakage.
Now check the installation and make sure the left and right pipelines are connected with their assigned vents.
Exactly measure a colon if you are going to use PEX tubing. Use thread on female couplings so that they are fixed better.
Make the cuts neat as use can. Use Teflon tape on the parts to save yourself from leakage.
Now fix the valve in its position. Now put all the other parts back as they were. Place the faucet and tighten its screws. Make sure the screws are tight, and the faucet is in the right position.
Testing
If you are done, then open the water supply for both pipes. Turn both handles on and test them. Make sure they are working correctly, and check if there are any leaks.
There probably won’t be, so you are food to enjoy your new faucet.
Conclusion
How to replace a two handle bathtub faucet. You may have different reasons for the replacement of the faucet. You might not want to hire a plumber, as they can be costly. You might just want to try something for yourself.
No matter what the reason, maybe it is good to have knowledge. You can replace them if you follow the steps above.
Related Guides