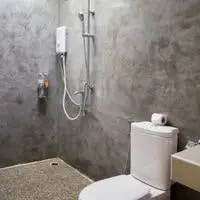
How to prep a shower for tile. The shower doesn’t seem fun if the surrounding isn’t good. You won’t feel like taking a shower if the surrounding is creepy or dirty. If not, you still want your shower to look good. That’s why tiling is done.
But before that, the place should be ready to set the tiles. Be it walls or the floor that needs it. I did this on my own and was able to prepare my walls very well. I figured that others would need help too. So what I did is presented in the article.
Before tiling, read this because it will give you a detailed way to prepare the walls and the floor.
How to prep a shower for tile

Tiles aren’t the only thing that is waterproof and are keeping their durability. Base work is needed to keep the tiles strong and the beauty intact.
It saves you from future maintenance expenses. Select suitable tiles for your bathroom.
Make sure you measure the length so you know the number of tiles required. If there are old tiles, remove them. Fixing a steam barricade is an important step.
Coat with a water-resisting material for better safety. The layout should be checked after applying the layer of water-resistance material.
Materials required
- Gloves and mask
- Glasses
- Pencil
- Measuring tape
- Knife
- Plastic sheets
- Saw
- Drill
- Silicon caulking
- Concrete board
- Staples
Steps
Clearing and preparing the walls before tiling is important, so follow the steps.
Plastic sheet
You need to apply plastic sheeting to the wall. Cut them with a knife and then staple them using studs. Multiple sheets can be used too.
Make sure they overlap each other. Sheet the pan and the flanges p to the wall. Use can stud the concrete board and drywall together.
Lengthening concrete board
Now you lengthen the concrete board. Measure the walls. Then make cuts in concrete board and cut it completely. Mount directly onto the studs and you will see that it fits easily like the drywall.
Measure with pencil and tape. Vertical studs that end at the end should be cut in such a way that they can share stud width.
Cutting
After measuring cut with a utility knife. Now place the T-Square on the concrete board in the opposite direction. Along the square edge, guide the utility knife by sliding it.
Now, along the second line, bend the piece. It will break the mark. Bend them while cutting from the backside by using a knife.
Now clear the holes by cutting out of them. Use the keyhole saw for this. Push/Pull it after inserting into the keyhole. Cut around smoothly.
Board installment
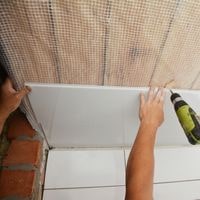
Place the board and install it. Start from below. Overlap the flange and shower pan with bottom pieces. Ensure that 1/8 inch of space remains in the overlapping.
Keeping the 1/8inch space. Screw the board. Studs should be 1/2 inches from the edges while screws 4 inches up the wall.
Silicone
The joints between the sheets should be spread with silicone caulking. It should be used against the pan and the corner should be covered.
Cover all the screw holes by using putty knives to spread. It will dry in a day, so wait. This ends, and your work is complete. You can now place the tiles.
Other ways
Many ways other than concrete are available for preparation. You can use waterproof backer boards for working. Paint-on latex waterproofing is an advanced variation. Preparations with interlocking membrane systems are also done.
But the concrete board is the most common and most trusted method by the construction companies. This method is also approved by tiling corporations and manufacturing companies.
Things to remember
- Wearing gloves should be a priority.
- Plan a layout before starting.
- Check the wall and studs.
- Masked edges and tape them for safety.
- The Shoer pan shouldn’t be moved.
- Measure lengths properly.
- Thin mortar is good.
- The joints should be small for grouting.
Conclusion
Preparing the area for tiling is important as tiling. Without it, the tiles will not be attached to the floor properly. Their strength won’t hold for long. Tips and requirements are better when met.
You can perform like a professional if you follow the above steps. Material quality should be kept in mind. The better you use it, the longer the life.
Related Guides