How to install cement board around a tub. Once in a while, the human body needs rest, and what is a better way than to have a long bath in your bathtub to relax. It is enjoyable as much as it is relaxing.
The water can splash here and there during a bath sometimes. The water will spill on the tiles and damage them. Though it might not look much at first. It still can damage the board. Especially if the board is made of wood. It can weaken it.
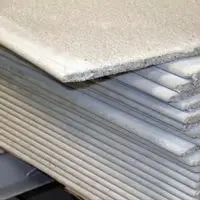
This is where the cement and concrete board comes in. Even though the board is not waterproof. The resistance offered by the board is good.
A cement board is made up of cement and reinforcing fiber designed in the form of sheets.
How to install cement board around a tub

Applying or installing the cement board is a good idea, especially if we keep it away from the lip of the tub. Then what we need to do is check the measurements of the area.
We also need to style the panels to make sure they are not loose and no water goes behind them. The pattern also needs to be carved for the proper installation.
Using galvanized screws will help you increase the life of the tub and the screws themselves. Wrap silicon around to strengthen and you are finished.
The steps
The steps are in simple wording. Follow them as they are for a better result.
Covering the tub
The first should always be to cover the tub as we do not want any damage to our tub. Use a drop cloth to cover the main areas and later tape them so they won’t come off on their own.
Walls and floor
If your floor is already tiled, then you can just place the board on plywood. the concrete is only needed to attach it firmly.
In the case of walls, a vapor barrier should be applied behind the cement board. Remember not to place it on any dry areas of the wall. It is better to remove the area and use a membrane to attach the boards.
Measurements
Taking the measurements is an important step as you need to make sure the board is of the right length and width.
Just make sure you measure the area of the middle wall of the tub.
Starting
Place the first sheet on the wall length-wise. It should be on the backside of the wall. Use spacers of the required length to hold the sheet above the tub lips. The length is commonly 1/4 inch.
Cover the sheet before installation of the board. The sheet will act as a vapor barrier. It is better to use a single sheet and preventing staples is also a good idea. Use screws to install the board in its position.
Fixing the panel
A carbide stripped knife is a suitable tool. Face the scores of the panel with it. Use force o put the panel behind. Then use fiberglass mesh to separate by cutting into it.
Designing the shape
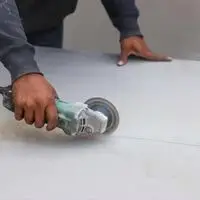
You should use a utility knife to cut the next sheet. Clamp the straight edge of the sheet and cut it to the proper length. Try making the pattern for the show head, spout, and valve.
Use a jigsaw to cut into the design and carve it accurately. Use a drill to make the holes that are for the placement of the pipes.
Make sure the stud surface remains on the same plane.
Etching the board
To strengthen the seam, install 1/8 inch first. Maintain the gap to fix them properly. Now cut the sides of the board that are left. The screws will provide enough space you need for the installation.
Covering with fiberglass
Cover the remaining seams with fiberglass. Use mortar to reinforce them. The places where both surfaces align use silicon around there.
After completing the tape, cut all the excess tape for the betterment of the tiles.
Conclusion
The board will protect your surfaces. Though it might seem to be expensive at first, the results are worth the money. It is a one-time expense and has years of no worries.
So it is better to do this rather than to keep worrying all the years while using your tub.
Related Guides