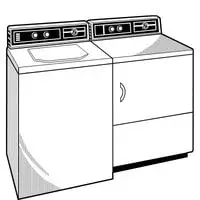
GE top load washer diagnostic mode. A washing machine is a time saver domestic appliance used to wash the dust and mud from the fabrics. It saves a lot of time, and you can also repair it easily if there is an issue with it.
It is very frustrating when you are ready to wash the laundry, and the machine does not start. You will have to check the washer diagnostic mode to find the troubleshooting in the machine.
This mode can be utilized to diagnose the different problems in the machine by accomplishing the automatic checking cycle.
You can also debug the problem by switching on and turning off the various parts of the machine.
Due to this, you will ensure which component of the washer is in the working position. You can also use this mode to correct the various logged errors in the machine.
GE top load washer diagnostic mode
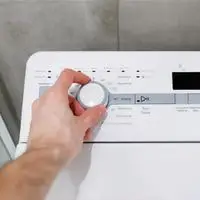
In top loader machines, a control board is fixed at the top of the motor. It has a small LED light that turns on and shows an error code that something is wrong in that part of the washer.
If there is a verified error issue in the machine, then press the power button and wait for a time so that the error code clears from the display.
Switch off the machine and wait for a minimum of five minutes. After that, plug in the motor and merit it to reboot. Now start the machine to spin a cycle.
If it is still giving an error on display, then you will have to diagnose the troubleshoot further. But sometimes, it does not show an error code on display. Then you will have to use the diagnostic mode manually to fix the error one by one.
To1 mode
This is the first mode that is displayed in the service mode. It actually doesn’t have any diagnostic property. It is just for settings in different models. You can just press the start button to enter this mode, and you can exit it by pressing the exit button.
To2 mode
Turn the knob of the device till the to2 appears on the panel. Press start to see the error codes. In this mode, you will see the recent error your machine faced. You can press the start button again to the next mode.
You should clear the errors as you check for the proper functioning of the device.
To3 mode
This mode is only used for software information. It cannot be used for diagnostics.
To4 mode
Rotate the knob till to4 appears. It is in LED and button reset mode. Press the start button and the light will turn on one by one so you can see if they are working or not. And in the case of buttons, you need to press them and see if the sensors detect them.
If a button or light doesn’t work, you need to get them replaced.
To5 mode
To enter this mode, you do not need to do much, but you just need to turn the knob. Keep turning until to5 appears in the device panel. P will appear on the device as the pump will; start running. It will run for 60 seconds and later return to to5.
If the washer doesn’t work or the water is not pumping out, that means either is clogged or damaged, you just need to clean it up, and if that doesn’t work, you might need to get a replacement for it.
To6 mode

The control knob should be rotated to reach or enter this mode as well. The start button should then be pressed. This model depends on steps.
When the mode runs, you will see an E appearing on display. This shows the tank is empty. It is only displayed if the tank is empty.
- Press start, and you will see that an F appears, meaning that the foam water tap has stopped.
- Press start again, and you will see nl appear, meaning that the water tap has stopped working.
- Again pressing the button will go in of, which actually means overflow.
- Pressing again will bring you back to the finest, so you can just exit this mode whenever you want.
Conclusion
There are other modes in diagnostics also, but the above are the most asked ones, so that is all. You can find out the error in the washer from one of the above error modes.
Related Guides