How to replace flush valve seal. Being the most visited place, the toilets face more issues too. Constant use probably wears and tears its parts. Tank problems and clogging are common.
My toilet had a valve seal issue. But I didn’t know on time. Then when my plumber friend visited, he identified the problem.
He fixed the problem and showed me the way to replace the seal, and gave superb tips. I helped him while he led the operation, and it was an easy success.
Mostly the seal is leaked, and water flows. An immediate fix should save the water from being wasted. Let’s see how.
How to replace flush valve seal
Turning off the water, so it’s not wasted, is first. The next step is tank cover removal. The cover just needs to be lifted.
Some may need to be unscrewed. All bolts should be kept safe after removing them.
With the help of a plier, remove the valve. Clean any residue. The residue is formed in water because of hardware.
Now a new seal is needed. It should be the same. Now set it. Close the lid. Flush to test.
See how below.
Required tools
- Screwdriver
- Wrench
- Gloves
- Mask
Steps
Providing certain steps to follow below.
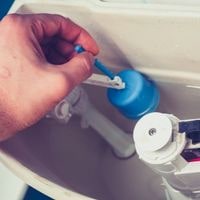
Water supply
Immediately turn the water supply off. Water flow will disrupt your work. Flush multiple times. Flushing will empty the tank into the bowl. Remove the float assembly. And other parts.
Cover removal
There is a lid on top of the toilet. It usually has screws under it. You can use screwdrivers, but if there are bolts, you will need a wrench. Remove them. Use pliers in case they are stuck.
Removing flappers
After removing the lid, all internal parts will be revealed. The flush valve seat has bolts on both sides. They are removable if you use a large wrench. Flappers should be lifted for complete removal. Put them somewhere with no dirt.
The flappers are connected to the opening and closing sides of the chain. The chain is connected to a rod the length of the toilet tank.
The rod then enters the overflow tube. You can push the rod further into the tube after you unscrew it. This will provide you with more space.
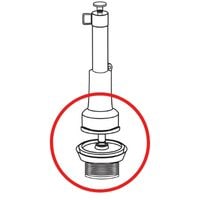
Removing the Valve
Adjustable pliers will help in removing the flush valve seat. Then remove the flapper hook. Disconnect the chain from the hook.
The water level bracket can be removed too, and so do the other parts if necessary. A useful tip is to take notes and organize the parts you removed.
Cleaning for prevention
Now clean the valve and the tank. If there is plastic, then cleaning will help you in noticing leaks easily. All residue should be cleaned so the new valve won’t get damaged. Dry it if it is damaged.
Taking measurements
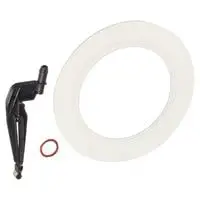
The old seal is now removed, and it is time for the new one. Use a measuring tape and note the measurements. The width is what should be kept in mind. It should match, but the slight difference is okay.
You can adjust it while setting it. Now buy one. Match the measurements. No holes are cut should be on the seal. That will leak.
Installing
After matching, get some adhesives. Pick good quality and apply them on the top of the valve. Stick it in its place. It is done through the square trip lever holder. It also needs the lasso at the end. The seal should be pulled in the reverse direction.
Keep turning the lever holder to ease installation. When in the middle of the tank and lever pulls the tube, and it makes it to the center of the top cap.
If water is coming, point the free end of it down. Now slowly push it down through the assembly and position it. Tighten it by moving.
Place the parts you organized in proper order. Installation should be inspected so we know if it is done properly. Put the lid on. Tighten the lid’s screw. Test it and check for seal leaks. It will not leak if the installation is proper.
Conclusion
The instructions above are for universal toilets. There can be a difference. Read the manual with the new valve and check the model number. Handle all parts carefully.
Call a professional for help if you fail. Try fixing the parts again if you want to do it. Check completely before making any move.
Related Guides